
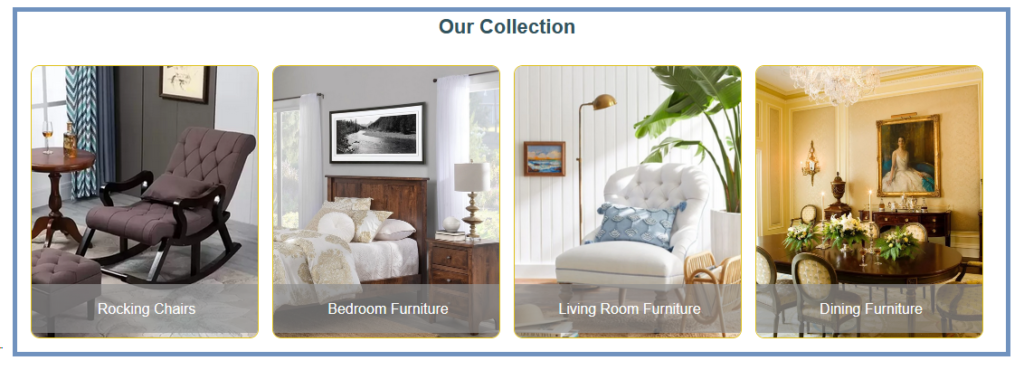
We are happy to inform that the Departments Widget, a new feature, is now available. With the help of this new widget, you can choose to display all top-level departments OR only the departments you want to highlight on the home page of your website. You can give this section a headline or title like “Shop by Department,” “Our Collection,” or any other heading you like.
How to display departments widget on my homepage?
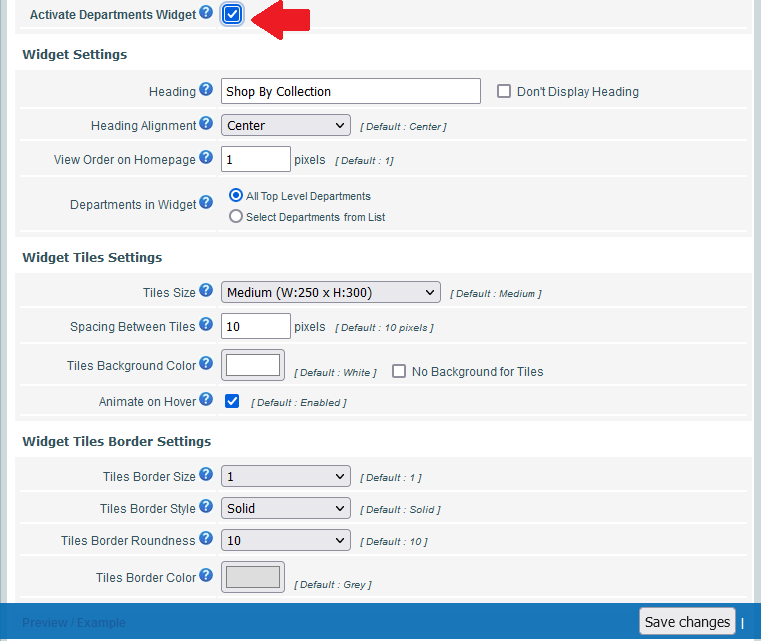
This is very easy to display the new departments widget on your homepage. Go to Design > Departments Widget menu option and enable the “Activate Departments Widget” option.
This new page gives you liberty to customize the departments widget according to your desire:
- Activate Departments Widget:
You can activate Departments Widget on the home page of your website by turning on this option. You can select to display all top-level departments OR only the departments you want to highlight on the home page of your website in the Departments widget. You can use any heading you like for this section’s header or title, such as “Shop by Department,” “Our Collection,” or another option. - Widget Heading:
You can give a heading or title to your departments widgets. Just enter any heading or title of your choice. If you do not wish to display any heading or title for your departments widget you can simply turn ON the “Do not Display Heading” option. - Heading Alignment:
You can change the alignment of heading to read in a Left, Center, or Right manner. - View Order on Homepage:
On your homepage, the departments widget will be visible between the Top and Bottom sections. If your homepage contains numerous widgets, you can vary the order in which they appear by modifying the View Order property. Simply enter “1” in the View Order column if you want the departments widget to appear first among other widgets. - Departments in Widget:
Choose the department list you wish to display in the widget. Select “All Top Level Departments” if you want the widget to show all top-level departments. - Widget Tile Size:
The size of the widget tiles can be changed to suit your preferences. The tile sizes of 150×180, 250×300, 300×420, and 500×600 can be used for Smaller, Medium, Large, and Extra-Large displays, respectively. - Spacing Between Tiles:
The distance, in pixels, between one department’s tile to another. - Tiles Background Color:
For your department tiles, you can select any background shade you like. If no background color is chosen, the system will use a white backdrop for your department tiles. You can choose the same background color as you have for your website. - Animate on Hover:
You can choose whether to provide your currently focused tile a very little animation when a user concentrates on a specific department tile. When a user puts their mouse over a department tile, it might be highlighted to make it stand out more. If you don’t want your department tiles to be animated, you can deactivate the option that will be selected by default. - Tiles Border Size:
You have a range of 0 to 10 options for border thickness for department tiles. If you don’t want borders around your department tiles, you can change the border thickness to “0” instead of the default value of “1”.. - Tiles Border Style:
For your department tiles, you can select the border style as per your choice. Options include Solid, Dashed, Dotted, and Hidden. For border styling, the “Solid” choice will be applied by default. - Tiles Border Roundness:
The roundness of the department tiles is entirely up to you. Both square and round product tiles are available. Simply choose “0” from the available options if you want square tiles. Your department tiles will have more rounded edges the more values you select. - Tiles Border Color:
You can select the border color for your department tiles in any color you like. The system will use a grey color for the borders of your department tiles if no color is selected.
Note: You have access to a preview area on this new page to see the changes before applying the design to your live website.
If you feel any difficulty in using this new feature, just drop us an email at support@storesecured.com and then our technical team will setup this new widget for you free of cost.
~ Your StoreSecured Team